

Pour tous ceux qui ont du mal à compiler , soit avec ARDUINO IDE ou PlatformIO, voici une méthode plus simple pour profiter de la nouvelle interface et des nouvelles fonctionnalités du NotifheureXL , ou tout simplement pour s’installer son premier notifheure.
Afin de vous épargner la phase de compilation , la recherche des bibliothèques , j’ai préparé les fichiers afin que vous n’ayez qu’a « les poussé » dans votre ESP favoris.
Ci-dessous une méthode simple pour flasher directement en ligne de commande, les sources déjà compilés.
Mise a jour du 23 Mai : Comment flasher dans un second temps en OTA avec le script espota.py
Pré-requis : installation python
Cette méthode , fonctionne aussi bien sur Windows 10 , Mac OSX ou encore Linux.
Etape 1 : Télécharger la dernière version de python .
Si vous avez déjà python, vous pouvez garder la version en cours. J’ai testé avec la 2.7 , et la 3.8 c’est Ok pour les deux.


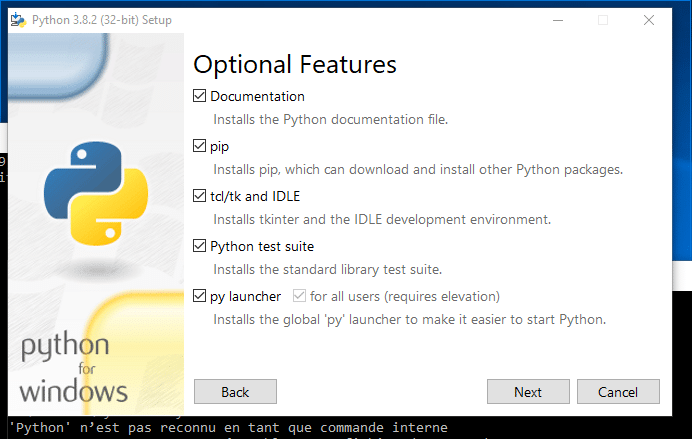
Pendant l’installation, pensez à activer les options d’environnement global, afin de pouvoir lancer la commande depuis n’importe quel dossier . l’option py, si elle existe permet de lancer python avec le raccourci py.

Je vérifie que tout fonctionne, j’ouvre le terminal ( sous Mac ou linux ) ou l’invite de commande ( sous windows ) , et je tape ;
python
Python 3.8.2 (v3.8.2:7b3ab5921f, Feb 24 2020, 17:52:18)
[Clang 6.0 (clang-600.0.57)] on darwin
Type "help", "copyright", "credits" or "license" for more information.
>>> quit()    // pour sortir
Il est tout à fait possible de faire cohabiter deux versions de python ( par exemple la 2.7 et la 3.8 ). Par exemple lacommande python2 lancera la version 2 x et la commande python lancera par défaut la version 3.x. exemple de mon fichier profile sous Mac, pour mes commandes par défaut en créant un alias dans le fichier .bash profile ( exemple ci-dessous de mon fichier profile)
# Setting PATH for Python 3.7
# The original version is saved in .bash_profile.pysave
PATH="/Library/Frameworks/Python.framework/Versions/3.7/bin:${PATH}"
export PATH
# Setting PATH for Python 2.7
# The original version is saved in .bash_profile.pysave
PATH="/Library/Frameworks/Python.framework/Versions/2.7/bin:${PATH}"
export PATH
# Setting PATH for Python 3.8
# The original version is saved in .bash_profile.pysave
PATH="/Library/Frameworks/Python.framework/Versions/3.8/bin:${PATH}"
export PATH
alias python=python3.8
alias python2=python2.7
alias pip=pip3
Etape 2 : installer esptool
C’est l’utilitaire , qui nous aidera à pousser les fichiers binaires dans l’ESP. La documentation complète de l’outil est disponible sur le github d’espressif.
Pour installer esptool , selon le système MAC OSX , Linux ou WINDOWS , les commandes peuvent êtres différentes selon la version de python ( 2.x ) ou ( 3.x ) , par exemple pour pip ( pip3 pour la version 3 ) . Il est possible, comme indiqué sur l’etape 1, de créer des alias , afin que pip lance la commande pip3 automatiquement , si python en version 3.x.
pip3 install esptool
Collecting esptool
  Downloading https://files.pythonhosted.org/packages/68/91/08c182f66fa3f12a96e754ae8ec7762abb2d778429834638f5746f81977a/esptool-2.8.tar.gz (84kB)
     |████████████████████████████████| 92kB 1.1MB/s
Collecting pyserial>=3.0 (from esptool)
  Downloading https://files.pythonhosted.org/packages/0d/e4/2a744dd9e3be04a0c0907414e2a01a7c88bb3915cbe3c8cc06e209f59c30/pyserial-3.4-py2.py3-none-any.whl (193kB)
     |████████████████████████████████| 194kB 2.1MB/s
Collecting pyaes (from esptool)
  Downloading https://files.pythonhosted.org/packages/44/66/2c17bae31c906613795711fc78045c285048168919ace2220daa372c7d72/pyaes-1.6.1.tar.gz
Collecting ecdsa (from esptool)
  Downloading https://files.pythonhosted.org/packages/b8/11/4b4d30e4746584684c758d8f1ddc1fa5ab1470b6bf70bce4d9b235965e99/ecdsa-0.15-py2.py3-none-any.whl (100kB)
     |████████████████████████████████| 102kB 2.3MB/s
Collecting six>=1.9.0 (from ecdsa->esptool)
  Downloading https://files.pythonhosted.org/packages/65/eb/1f97cb97bfc2390a276969c6fae16075da282f5058082d4cb10c6c5c1dba/six-1.14.0-py2.py3-none-any.whl
Installing collected packages: pyserial, pyaes, six, ecdsa, esptool
  Running setup.py install for pyaes ... done
  Running setup.py install for esptool ... done
Successfully installed ecdsa-0.15 esptool-2.8 pyaes-1.6.1 pyserial-3.4 six-1.14.0
WARNING: You are using pip version 19.2.3, however version 20.0.2 is available.
You should consider upgrading via the 'pip install --upgrade pip' command.
il est possible de mettre a jour , aussi sa version de pip par la commande ( pip install –upgrade pip ).
Si l’installation bloque , il est possible d’utiliser l’option -m avec la commande python ou py ( selon le type d’installation effectué ).
py -m pip install esptool
ou
python -m pip install esptool
Je teste la commande esptool.py , afin de vérifier son fonctionnement.
esptool.py
esptool.py v2.8
usage: esptool [-h] [--chip {auto,esp8266,esp32}] [--port PORT] [--baud BAUD]
               [--before {default_reset,no_reset,no_reset_no_sync}]
               [--after {hard_reset,soft_reset,no_reset}] [--no-stub]
               [--trace] [--override-vddsdio [{1.8V,1.9V,OFF}]]
               {load_ram,dump_mem,read_mem,write_mem,write_flash,run,image_info,make_image,elf2image,read_mac,chip_id,flash_id,read_flash_status,write_flash_status,read_flash,verify_flash,erase_flash,erase_region,version}
               ...
esptool.py v2.8 - ESP8266 ROM Bootloader Utility
positional arguments:
  {load_ram,dump_mem,read_mem,write_mem,write_flash,run,image_info,make_image,elf2image,read_mac,chip_id,flash_id,read_flash_status,write_flash_status,read_flash,verify_flash,erase_flash,erase_region,version}
                        Run esptool {command} -h for additional help
    load_ram            Download an image to RAM and execute
    dump_mem            Dump arbitrary memory to disk
    read_mem            Read arbitrary memory location
    write_mem           Read-modify-write to arbitrary memory location
    write_flash         Write a binary blob to flash
    run                 Run application code in flash
    image_info          Dump headers from an application image
    make_image          Create an application image from binary files
    elf2image           Create an application image from ELF file
    read_mac            Read MAC address from OTP ROM
    chip_id             Read Chip ID from OTP ROM
    flash_id            Read SPI flash manufacturer and device ID
    read_flash_status   Read SPI flash status register
    write_flash_status  Write SPI flash status register
    read_flash          Read SPI flash content
    verify_flash        Verify a binary blob against flash
    erase_flash         Perform Chip Erase on SPI flash
    erase_region        Erase a region of the flash
    version             Print esptool version
optional arguments:
  -h, --help            show this help message and exit
  --chip {auto,esp8266,esp32}, -c {auto,esp8266,esp32}
                        Target chip type
  --port PORT, -p PORT  Serial port device
  --baud BAUD, -b BAUD  Serial port baud rate used when flashing/reading
  --before {default_reset,no_reset,no_reset_no_sync}
                        What to do before connecting to the chip
  --after {hard_reset,soft_reset,no_reset}, -a {hard_reset,soft_reset,no_reset}
                        What to do after esptool.py is finished
  --no-stub             Disable launching the flasher stub, only talk to ROM
                        bootloader. Some features will not be available.
  --trace, -t           Enable trace-level output of esptool.py interactions.
  --override-vddsdio [{1.8V,1.9V,OFF}]
                        Override ESP32 VDDSDIO internal voltage regulator (use
                        with care)
Maintenant que l’utilitaire est installé, je vais pouvoir transférer mes firmwares compilés directement dans mon ESP.
Les FIRMWARES compilés
Pour commencer , il va falloir récupérer les fichiers binaires compilés. J’ai mis a disposition, les firmwares déjà compilés . Ces firmwares ont été compilés pour des modules WemosD1, D2 ou Mini ou équivalent, ayant 4 Mo de mémoire.
Deux versions de firmwares , selon le type de matrices ( ICSStation et FC16 ) :
Lors de l’écriture de cet article , je suis à la version 0.8.6.0
Une version commune pour la mémoire SPIFFs ( contenant le dossier data , pour la configuration , fichier de config , etc)
Pour les firmwares , suivez ce lien.
Décompresser et déposer les fichiers dans le même dossier , et se placer à l’intérieur de ce dossier via le terminal ou l’invite de commande selon son Système d’exploitation.
Transfert des firmwares
Il suffit de suivre ces étapes :
- Brancher le module ESP , sur le port USB :
Sous Windows , le numéro de port peut etre récupéré via la commande mode.
Microsoft Windows [version 10.0.17134.1]
(c) 2018 Microsoft Corporation. Tous droits réservés.
C:\Users\SPARE>mode
Statut du périphérique COM6:
----------------------------
    Baud :            1200
    Parité :          None
    Bits de données : 8
    Bits d’arrêt :    1
    Temporisation :   OFF
    XON/XOFF :        OFF
    Protocole CTS :   OFF
    Protocole DSR :   OFF
    Sensibilité DSR : OFF
    Circuit DTR :     ON
    Circuit RTS :     ON
Statut du périphérique CON:
---------------------------
    Lignes :          300
    Colonnes :        80
    Vitesse clavier : 31
    Délai clavier :   1
    Page de codes :   850
Dans cet exemple , le numéro de port Windows est le COM6.
Sous MAC OSX , il faudra utiliser la commande ls /dev/tty.*
 ls /dev/tty.*
/dev/tty.Bluetooth-Incoming-Port	/dev/tty.wchusbserialfa1230
Sous mac , mon port est : /dev/tty.wchusbserialfa1230
- flasher le module ESP
- Sous Mac OSX
esptool.py --port /dev/tty.wchusbserialfa1230 write_flash -fm dio 0x00000 notifheureXL_ICS_0.8.6.0.bin 0x300000 notifheureXL_SPIFFS_0.8.bin- Sous Windows
esptool.py --port com6 write_flash -fm dio 0x00000 notifheureXL_ICS_0.8.6.0.bin 0x300000 notifheureXL_SPIFFS_0.8.bince qui donne :
esptool.py v2.8
Serial port /dev/tty.wchusbserialfa1240
Connecting....
Detecting chip type... ESP8266
Chip is ESP8266EX
Features: WiFi
Crystal is 26MHz
MAC: a0:20:a6:12:55:23
Uploading stub...
Running stub...
Stub running...
Configuring flash size...
Auto-detected Flash size: 4MB
Compressed 502016 bytes to 348644...
Wrote 502016 bytes (348644 compressed) at 0x00000000 in 31.2 seconds (effective 128.9 kbit/s)...
Hash of data verified.
Compressed 1024000 bytes to 71788...
Wrote 1024000 bytes (71788 compressed) at 0x00300000 in 6.7 seconds (effective 1226.8 kbit/s)...
Hash of data verified.
Leaving...
Hard resetting via RTS pin...
Quelques options utiles
Flasher uniquement la memoire SPIFFS
esptool.py --port /dev/tty.wchusbserialfa1230 write_flash -fm dio 0x300000 notifheureXL_SPIFFS_0.8.binFlasher uniquement le firmware
esptool.py --port /dev/tty.wchusbserialfa1230 write_flash -fm dio 0x00000 notifheureXL_ICS_0.8.6.0.binpour information comment effacer la memoire complete
esptool.py --port COM6 erase_flashMettre à jour les firmwares en OTA .
Maintenant que le notifHeure à été flashé, il est possible de le mettre à jour à distance via le WIFI. Pour cela je vais utiliser le script espota.py.
Il suffit simplement de renseigner l’adresse IP du notifHeure ( déjà flashé avec un firmware compatible OTA ) et de lui indiquer le chemin du firmware à uploader.. Par exemple si mon notifheure à l’adresse : 192.168.1.2 , j’execute le code via la commande python ( ou python3 ou py selon l’environnement utilisé ).
Placez tous les fichiers nécessaires dans le même dossier , pour faciliter l’écriture de la commande.
python espota.py -i 192.168.1.2 -f firmwaresketch.bin -i adresse IP du module ESP
–f fichier à uploader dans le module ESP ( par exemple firmware.bin , si dans le même dossier ou /path/to/file/firmware.bin pour un dossier différent.)
Par défaut remplace le sketch existant. Pour télécharge le firmware dédié à l’espace SPIFFS ( dossier data ) , il faudra utiliser l’option -s .
python espota.py -i 192.168.1.2 -s -f spiffs.binScript espota.py complet ( avec les différentes options )
#!/usr/bin/env python3
#
# Original espota.py by Ivan Grokhotkov:
# https://gist.github.com/igrr/d35ab8446922179dc58c
#
# Modified since 2015-09-18 from Pascal Gollor (https://github.com/pgollor)
# Modified since 2015-11-09 from Hristo Gochkov (https://github.com/me-no-dev)
# Modified since 2016-01-03 from Matthew O'Gorman (https://githumb.com/mogorman)
#
# This script will push an OTA update to the ESP
# use it like: python3 espota.py -i <ESP_IP_address> -I <Host_IP_address> -p <ESP_port> -P <Host_port> [-a password] -f <sketch.bin>
# Or to upload SPIFFS image:
# python3 espota.py -i <ESP_IP_address> -I <Host_IP_address> -p <ESP_port> -P <HOST_port> [-a password] -s -f <spiffs.bin>
#
# Changes
# 2015-09-18:
# - Add option parser.
# - Add logging.
# - Send command to controller to differ between flashing and transmitting SPIFFS image.
#
# Changes
# 2015-11-09:
# - Added digest authentication
# - Enhanced error tracking and reporting
#
# Changes
# 2016-01-03:
# - Added more options to parser.
#
from __future__ import print_function
import socket
import sys
import os
import optparse
import logging
import hashlib
import random
# Commands
FLASH = 0
SPIFFS = 100
AUTH = 200
PROGRESS = False
# update_progress() : Displays or updates a console progress bar
## Accepts a float between 0 and 1. Any int will be converted to a float.
## A value under 0 represents a 'halt'.
## A value at 1 or bigger represents 100%
def update_progress(progress):
  if (PROGRESS):
    barLength = 60 # Modify this to change the length of the progress bar
    status = ""
    if isinstance(progress, int):
      progress = float(progress)
    if not isinstance(progress, float):
      progress = 0
      status = "error: progress var must be float\r\n"
    if progress < 0:
      progress = 0
      status = "Halt...\r\n"
    if progress >= 1:
      progress = 1
      status = "Done...\r\n"
    block = int(round(barLength*progress))
    text = "\rUploading: [{0}] {1}% {2}".format( "="*block + " "*(barLength-block), int(progress*100), status)
    sys.stderr.write(text)
    sys.stderr.flush()
  else:
    sys.stderr.write('.')
    sys.stderr.flush()
def serve(remoteAddr, localAddr, remotePort, localPort, password, filename, command = FLASH):
  # Create a TCP/IP socket
  sock = socket.socket(socket.AF_INET, socket.SOCK_STREAM)
  server_address = (localAddr, localPort)
  logging.info('Starting on %s:%s', str(server_address[0]), str(server_address[1]))
  try:
    sock.bind(server_address)
    sock.listen(1)
  except:
    logging.error("Listen Failed")
    return 1
  # Check whether Signed Update is used.
  if ( os.path.isfile(filename + '.signed') ):
    filename = filename + '.signed'
    file_check_msg = 'Detected Signed Update. %s will be uploaded instead.' % (filename)
    sys.stderr.write(file_check_msg + '\n')
    sys.stderr.flush()
    logging.info(file_check_msg)

  content_size = os.path.getsize(filename)
  f = open(filename,'rb')
  file_md5 = hashlib.md5(f.read()).hexdigest()
  f.close()
  logging.info('Upload size: %d', content_size)
  message = '%d %d %d %s\n' % (command, localPort, content_size, file_md5)
  # Wait for a connection
  logging.info('Sending invitation to: %s', remoteAddr)
  sock2 = socket.socket(socket.AF_INET, socket.SOCK_DGRAM)
  remote_address = (remoteAddr, int(remotePort))
  sent = sock2.sendto(message.encode(), remote_address)
  sock2.settimeout(10)
  try:
    data = sock2.recv(128).decode()
  except:
    logging.error('No Answer')
    sock2.close()
    return 1
  if (data != "OK"):
    if(data.startswith('AUTH')):
      nonce = data.split()[1]
      cnonce_text = '%s%u%s%s' % (filename, content_size, file_md5, remoteAddr)
      cnonce = hashlib.md5(cnonce_text.encode()).hexdigest()
      passmd5 = hashlib.md5(password.encode()).hexdigest()
      result_text = '%s:%s:%s' % (passmd5 ,nonce, cnonce)
      result = hashlib.md5(result_text.encode()).hexdigest()
      sys.stderr.write('Authenticating...')
      sys.stderr.flush()
      message = '%d %s %s\n' % (AUTH, cnonce, result)
      sock2.sendto(message.encode(), remote_address)
      sock2.settimeout(10)
      try:
        data = sock2.recv(32).decode()
      except:
        sys.stderr.write('FAIL\n')
        logging.error('No Answer to our Authentication')
        sock2.close()
        return 1
      if (data != "OK"):
        sys.stderr.write('FAIL\n')
        logging.error('%s', data)
        sock2.close()
        sys.exit(1)
        return 1
      sys.stderr.write('OK\n')
    else:
      logging.error('Bad Answer: %s', data)
      sock2.close()
      return 1
  sock2.close()
  logging.info('Waiting for device...')
  try:
    sock.settimeout(10)
    connection, client_address = sock.accept()
    sock.settimeout(None)
    connection.settimeout(None)
  except:
    logging.error('No response from device')
    sock.close()
    return 1
  received_ok = False
  try:
    f = open(filename, "rb")
    if (PROGRESS):
      update_progress(0)
    else:
      sys.stderr.write('Uploading')
      sys.stderr.flush()
    offset = 0
    while True:
      chunk = f.read(1460)
      if not chunk: break
      offset += len(chunk)
      update_progress(offset/float(content_size))
      connection.settimeout(10)
      try:
        connection.sendall(chunk)
        if connection.recv(32).decode().find('O') >= 0:
          # connection will receive only digits or 'OK'
          received_ok = True
      except:
        sys.stderr.write('\n')
        logging.error('Error Uploading')
        connection.close()
        f.close()
        sock.close()
        return 1
    sys.stderr.write('\n')
    logging.info('Waiting for result...')
    # libraries/ArduinoOTA/ArduinoOTA.cpp L311 L320
    # only sends digits or 'OK'. We must not not close
    # the connection before receiving the 'O' of 'OK'
    try:
      connection.settimeout(60)
      received_ok = False
      received_error = False
      while not (received_ok or received_error):
        reply = connection.recv(64).decode()
        # Look for either the "E" in ERROR or the "O" in OK response
        # Check for "E" first, since both strings contain "O"
        if reply.find('E') >= 0:
          sys.stderr.write('\n')
          logging.error('%s', reply)
          received_error = True
        elif reply.find('O') >= 0:
          logging.info('Result: OK')
          received_ok = True
      connection.close()
      f.close()
      sock.close()
      if received_ok:
        return 0
      return 1
    except:
      logging.error('No Result!')
      connection.close()
      f.close()
      sock.close()
      return 1
  finally:
    connection.close()
    f.close()
  sock.close()
  return 1
# end serve
def parser(unparsed_args):
  parser = optparse.OptionParser(
    usage = "%prog [options]",
    description = "Transmit image over the air to the esp8266 module with OTA support."
  )
  # destination ip and port
  group = optparse.OptionGroup(parser, "Destination")
  group.add_option("-i", "--ip",
    dest = "esp_ip",
    action = "store",
    help = "ESP8266 IP Address.",
    default = False
  )
  group.add_option("-I", "--host_ip",
    dest = "host_ip",
    action = "store",
    help = "Host IP Address.",
    default = "0.0.0.0"
  )
  group.add_option("-p", "--port",
    dest = "esp_port",
    type = "int",
    help = "ESP8266 ota Port. Default 8266",
    default = 8266
  )
  group.add_option("-P", "--host_port",
    dest = "host_port",
    type = "int",
    help = "Host server ota Port. Default random 10000-60000",
    default = random.randint(10000,60000)
  )
  parser.add_option_group(group)
  # auth
  group = optparse.OptionGroup(parser, "Authentication")
  group.add_option("-a", "--auth",
    dest = "auth",
    help = "Set authentication password.",
    action = "store",
    default = ""
  )
  parser.add_option_group(group)
  # image
  group = optparse.OptionGroup(parser, "Image")
  group.add_option("-f", "--file",
    dest = "image",
    help = "Image file.",
    metavar="FILE",
    default = None
  )
  group.add_option("-s", "--spiffs",
    dest = "spiffs",
    action = "store_true",
    help = "Use this option to transmit a SPIFFS image and do not flash the module.",
    default = False
  )
  parser.add_option_group(group)
  # output group
  group = optparse.OptionGroup(parser, "Output")
  group.add_option("-d", "--debug",
    dest = "debug",
    help = "Show debug output. And override loglevel with debug.",
    action = "store_true",
    default = False
  )
  group.add_option("-r", "--progress",
    dest = "progress",
    help = "Show progress output. Does not work for ArduinoIDE",
    action = "store_true",
    default = False
  )
  parser.add_option_group(group)
  (options, args) = parser.parse_args(unparsed_args)
  return options
# end parser
def main(args):
  # get options
  options = parser(args)
  # adapt log level
  loglevel = logging.WARNING
  if (options.debug):
    loglevel = logging.DEBUG
  # end if
  # logging
  logging.basicConfig(level = loglevel, format = '%(asctime)-8s [%(levelname)s]: %(message)s', datefmt = '%H:%M:%S')
  logging.debug("Options: %s", str(options))
  # check options
  global PROGRESS
  PROGRESS = options.progress
  if (not options.esp_ip or not options.image):
    logging.critical("Not enough arguments.")
    return 1
  # end if
  command = FLASH
  if (options.spiffs):
    command = SPIFFS
  # end if
  return serve(options.esp_ip, options.host_ip, options.esp_port, options.host_port, options.auth, options.image, command)
# end main
if __name__ == '__main__':
  sys.exit(main(sys.argv))
# end if
18 commentaires sur “Flasher facilement un NotifHeure”
Parfait, c’est exactement ça.
J’ai enlever « OPTION », et j’ai les infos qui remontent bien dans Jeedom.
Il ne reste plus que l’intensité de l’affichage qui ne remonte pas avec INT.
Il y a une liste quelques part que j’aurai raté ?
Je me réponds tout seul 😉
J’ai trouvé, c’est « INTENSITY » maintenant 😉
yes
Bonjour à tous,
Merci pour tous ces tutos., je crois que je les ai tous lu au moins 2 fois…. 😉
J’ai un Notif’Heure 1×4 matrice qui tourne avec Jeedom, et maintenant je m’attaque à un XL, avec 2×4 matrices.
J’ai quelques questions :
j’ai flashé avec esptool.py –port com6 write_flash -fm dio 0x00000 notifheureXL_FC16_1.0.1.bin 0x300000 notifheureXL_LITTLEFS_1.0.1.bin
Du coup, la partie OTA est comprise dedans ou pas ? je m’y perd….
quand j’essaye de jouer avec espota.py ensuite, il me met tout le temps une erreur… mais le module fonctionne bien hein, et j’ai l’interface web.
Mes 2 notifHeure (normal en 3.3.4 et XL en 1.0.1) sont sur Jeedom, via script.
Pour le normale, j’ai bien les retours d’info, via 192.168.x.x/GetInfo, mais pas sur le XL. J’ai dupliqué l’objet script du premier, et changé les IPs. Du coup, je ne vois pas où j’ai fait une bêtise… vous auriez une idée ?
Bonne soirée à tous 😉
bonjour ,
Pour information le nouveau firmwareXL du notifheure , permet de gérer aussi les anciens notifheure . Je préconise de mettre le nouveau firmware sur vos deux notifheure .L’ancien firmware n’est plus mis à jour.
La configuration pour le nombre de matrice et les options se passe sur la page setup
http://192.168.x.x/setup.html
Des le premier flash de l’esp , l’OTA est accessible.Pour la prise en compte le module ESP à besoin de redémarrer.
Par contre en OTA , c’est un firmware à la fois ( Le sketch ou le fichier FS – depuis la version 1 il faut utiliser LittleFS et plus spiffs ).
Pour récupérer les infos via une requéte html ( format json ) : 192.168.x.x/getInfo ( le g en minuscule et le I en majuscule )
@+
Bonjour,
Merci pour tes retours 😉
Ok, donc au premier flash tout est ok. Pour info, j’ai du faire « py -m esptool –port com3 write_flash -fm dio 0x00000 notifheureXL_FC16_1.0.1.bin 0x300000 notifheureXL_LITTLEFS_1.0.1.bin » pour que ça passe.
Effectivement, erreur de frappe. J’ai bien 192.168.x.x/getInfo ( le g en minuscule et le I en majuscule ), mais pas d’info qui remonte. *
Du coup je me demandais si les options n’avait pas changé de format ?
Par exemple pour remonter l’état de l’affichage de l’horloge, sur l’ancien Notif’Heure, j’ai « Options>HOR » en requête. C’est toujours valable ?
L’option /getInfo , remonte un fichier JSON , selon le navigateur utilisé l’info peut, ou ne pas être affiché ( j’ai testé sous plusieurs chez moi les infos remontent bien , le fichier est bien affiché dans mes différents navigateurs )
Dans la mesure du possible j’ai récupéré le maximum des options et commandes qui etaient présentent dans la première version.Il y a eu quelques modification de faites sur la structure du fichier uniquement.
Dans la nouvelle version , j’ai ajouté de nombreuses commandes sup ainsi que la prise en charge de MQTT , pour éviter les scripts et accélérer le temps de réponse.
La commande http://ipnotif/Options?HOR=true ou false permet d’afficher ou de masquer l’horloge.
Ci dessous un extrait de mon fichier Json avec la requête getInfo ( on peut l’afficher avec la plupart des navigateurs )
{
« HARDWARE »: « NotifheureXL »,
« CONFIG »: true,
« NOM »: « bureau »,
« SEC »: true,
« HOR »: true,
« LUM »: true,
« REV »: false,
« DDHT »: false,
« TEMPDDHT »: 5,
« MSGALARM »: « Votre Alarme vient de se declencher !!! »,
« MSGMINUT »: « Fin Minuteur ! votre minuteur est terminé »,
« HFLAG »: « INQJ »,
« TIMEREV »: [
7,
0
],
« NTPSERVER »: « 192.168 …..
…..
Pour récupérer les infos JSON sous jeedom , il faut utiliser les clés dans le bon ordre . Dans l’ancienne version le fichier JSON avait une partie Options , dans le nouveau Json , la plupart des clés sont à la racine . Donc sous jeedom , il va falloir utiliser HOR à la place de Options>HOR ( la clé options n’existe plus ).
Bonjour, c’est beaucoup plus simple comme ca, mais peut on modifier le type de matrice ? Merci
Bonjour sebastien , les firmwares sont compilés avec un type de matrice défini . A ce jour je n’ai pu tester qu’avec Deux types de Matrices FC16 et ICS , je n’ai jamais vu les autres types ( Parola et Generic ) .
Si besoin d’utiliser d’autre type de matrice , il va falloir tester en modifiant la ligne correspondant au type de matrices
Au debut du script ( dans les premieres lignes du fichier .ino ) :
//****************************************************
// En fonction de vos matrices , si probléme *
// d’affichage ( inversé , effet miroir , etc …..) *
// ***************************************************
// matrix – decocher selon config matrix ********
//#define HARDWARE_TYPE MD_MAX72XX::FC16_HW //***
//#define HARDWARE_TYPE MD_MAX72XX::PAROLA_HW //***
#define HARDWARE_TYPE MD_MAX72XX::ICSTATION_HW //***
//#define HARDWARE_TYPE MD_MAX72XX::GENERIC_HW //***
// ***************************************************
il est possible de choisir le type de matrice : GENERIC , ICS , FC16 et Parola
Par contre pour generic et parola , c’est à tester , je n’ai pas pu valider ce fonctionnement.
Super tuto ! Et la même en OTA, c’est possible? J’ai vu qu’il existe un espota.py, tu penses que c’est faisable ?
Cela doit être possible. J’ai modifié l’article , pour parler de ESPOTA.PY
si notif ip = 192.168.1.2
python espota.py -i 192.168.1.2 -f firmwaresketch.bin pour le sketch
et
python espota.py -i 192.168.1.2 -s -f spiffs.bin pour le dossier data ( SPIFFS) option -s à rajouter.
Quelle réactivité, vraiment, bravo !!!!
Tout d’abord, un grand merci pour ton travail !
J’utilise au quotidien Notif’heure avec Jeedom.
Bon j’étais resté à une première version depuis longtemps et je me suis décidé à tester la version XL.
Je voudrais rajouter 2 infos pour ton tuto qui marche très bien mais sur lesquelles j’ai un peu buté.
J’ai fait l’install depuis windows et il faudrait préciser que la commande « python » doit être saisie dans l’invit de commande windows. Perso, j’essayais de la taper dans l’outil python.
Et pour le répertoire où mettre les firmwares, préciser que c’est dans celui où on est dans l’invit de commande pour windows (c:\users\bidule par ex)
Sinon, c’est top et bien plus facile à mettre en oeuvre.
Continue ainsi !
bonjour ,
merci pour tes remarques , je vais corriger dans ce sens.
Un grand bravo et merci pour cet article ! je m’arrachais les cheveux pour la prog avec Arduino, et là c’est passé tout seul !
Astuce pour ceux qui n’auraient pas trouvé : pour réaliser la mise à jour OTA, il faut récupérer un fichier ‘espota.py’ (dispo sur GitHub dans Arduino par exemple) et le placer dans votre répertoire de travail.
Bonne programmation à tous …